




How to make the most of Biosec’s Dryset Pro electronic system
Everything you need to know about electronic drying control
Welcome to our section dedicated to the culture of food preservation and the fight against food waste. Those who know me are well aware of how strongly I believe in the value of raw ingredients and in respecting the work of farmers and artisans. Drying isn’t simply about “removing water” to make food last longer; it means concentrating flavours, preserving vitamins and nutrients intact, and transforming a fresh produce into a store of flavour available all year round. But to do this perfectly, passion alone is not enough: precision is required.
This is precisely where the Dryset Pro electronic system. We’re not talking about a simple heating element that just heats the air at random, but the actual ‘brain’ of our dryers. Understanding how to interact with this system will enable you to achieve extraordinary results, whilst saving time and energy. Let’s look at this together, step by step, to see how to master every programme and special function.
Why Dryset Pro technology makes all the difference
Before going into detail about the individual buttons, it is essential to understand the basic concept. Drying is a delicate balance between temperature, air flow and time. Il sistema Dryset Pro è stato sviluppato tenendo conto di tutte queste variabili. Non si limita a mantenere una temperatura costante, ma modula il calore e la velocità della ventola a seconda delle diverse fasi del processo e del programma scelto. Questo si traduce in una disidratazione omogenea che rispetta la natura del cibo, evitando quando serve che l’esterno si secchi troppo velocemente bloccando l’umidità all’interno (il cosiddetto “case hardening”).
Getting started: switching on and basic controls
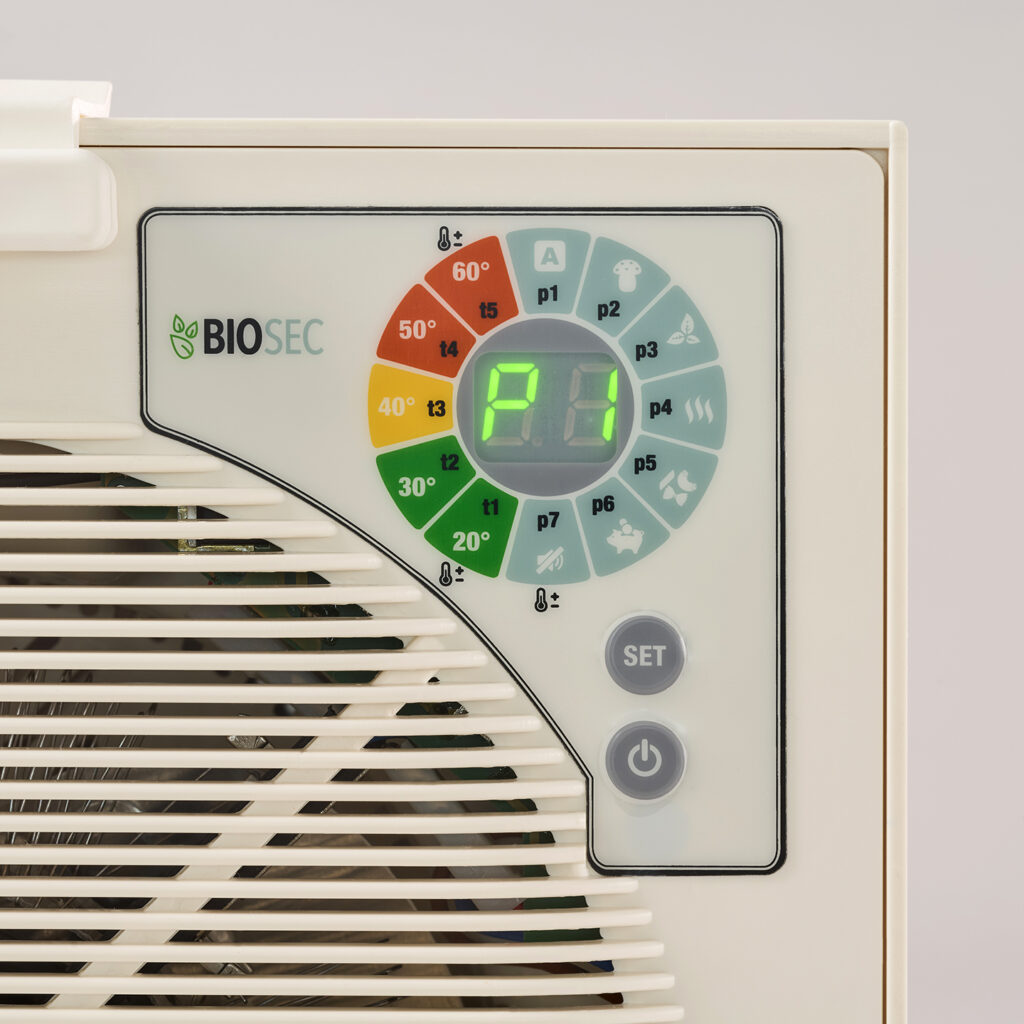
Simplicity is our strength. When you plug it in, your tumble dryer switches on automatically and enters standby mode. From there, you have full control using just two main buttons:
- SET button: By pressing it repeatedly, you can scroll through all the programmes available on the display until you find the one that suits your needs. Whilst the appliance is running, if you press SET briefly, you can view the programme currently in use if you do not wish to wait for it to appear automatically on the screen, which normally alternates between showing the programme and the temperature detected at that moment.
- ON/OFF button: This is used to start or pause the drying cycle. Want to change your mind partway through? No problem. Pause the cycle using the ON/OFF button, press SET to select the new programme, and restart. The system will reset the previous cycle and immediately begin operating with the new settings.
A detail that is by no means insignificant: in the event of power cut, you won’t lose your work. When the power comes back on, the dryer will resume exactly from the point and programme where it was interrupted, alerting you to the fault with two flashing dots on the display to prompt you to check the condition of the items.
Preset programmes: a solution for every ingredient
We’ve created these preset programmes by drawing on years of experience and feedback from our community. Each one is like a secret recipe that adjusts the heat and ventilation for you.
P1 – Automatic
This is the “life-saving” programme – the most versatile. If you have a particular ingredient, or if you’re trying food drying for the first time and feel a bit unsure, play it safe with P1. It operates at a maximum temperature of 55°C, which is ideal for the vast majority of fruit and vegetables, guaranteeing excellent results without any hassle. It automatically switches to the ‘Hold’ setting after 30 hours, unless otherwise set.
P2 – Mushrooms and thin slices
This programme is designed for foods that are not excessively watery, cut into slices between 4 and 6 millimetres thick. It’s your perfect ally for the autumn mushroom harvest, but also for making crispy crisps from apples, courgettes, aubergines or pears. The maximum temperature of 50°C gently dries the produce without causing it to brown, and after 18 hours of operation (unless otherwise set), it switches to the Keep Warm mode so that everything is ready for packing.
P3 – Raw Foodist
The essence of the raw food diet lies in preserving the natural enzymes and heat-sensitive vitamins found in fresh foods. The P3 programme is a gem of delicacy: it reaches 42°C only during the first two hours (to eliminate the initial bacterial load and prevent surface evaporation), before stabilising at 40°C. I also find it indispensable for processing the most delicate culinary and medicinal herbs, fully preserving their essential oils and vibrant colour. The programme duration is not preset but can be set using the manual timer.
P4 – Superhot
This is the programme that generates the most heat, pushing the boundaries of cooking with its 68 degrees. Use it for the toughest challenges: water-rich ingredients (such as tomatoes), citrus fruits, or dishes that require a rapid reduction in bacterial count, such as jerky meat and strips of fish. A tip from a pro? Use it to make meringues! The Dryset Pro’s precision will prevent any unpleasant burning, leaving your oven free for other dishes. Preset to switch to Keep Warm after 24 hours, it can also be set manually to different durations.
P5 – Pasta
Fresh pasta requires special care: if it is dried too quickly, the surface will crack. The P5 operates at mild temperatures (30°C) with extremely gentle ventilation, simulating the slow, natural drying process used in artisan pasta factories. It automatically switches to the ‘Keep Warm’ mode after 16 hours, unless otherwise set.
P6 – Economy
For those who care about both the environment and household energy consumption. This programme slightly extends the drying time, but drastically reduces electricity consumption, bringing it down to a maximum of 270W. It’s ideal if you have other appliances running at home, or if you’re in a campervan or on a campsite. It operates at a maximum of 45 degrees, for an indefinite duration that can be set manually.
P7 – Silent
Il rumore non deve mai essere un ostacolo. Questo programma riduce la velocità della ventola per minimizzare le emissioni acustiche, rendendolo perfetto per le ore notturne. La ventilazione dolce lo rende strategico anche per essiccare prodotti molto leggeri, come i pistilli di zafferano o i piccoli petali, che con altri programmi rischierebbero di volare via dai cestelli. Lavora ad un massimo di 45 gradi per 48 ore, è uno dei tre programmi in cui oltre al tempo possiamo impostare manualmente anche la temperatura.
Full control with the manual programmes (t1 to t5)
Whether you’re a natural experimenter or a professional looking to set strict parameters, the manual programmes are for you. They allow you to set a working range from 20°C (t1) up to 60°C (t5). These programmes operate intelligently by alternating between hot air and periods of cold ventilation. They have no preset time limits, so it’s up to you to stop the machine once the desired consistency is reached, or to use the Timer function.
The special functions that make all the difference: Timer and Keep-warm
These two functions are the real trump card of our electronic system, designed to adapt the drying process to your lifestyle, rather than the other way round.
The Maintenance function: no more damaged products
One of the main concerns for those who use a tumble dryer is: “What happens if the cycle finishes whilst I’m asleep or at work?”. The answer lies in the “Maintenance” mode. At the end of many programmes (those marked with the MN symbol), the Dryset Pro lowers the temperature to around 42°C and alternates between periods of ventilation and pauses. In this way, the dryer keeps your products in a protected, dry environment, preventing them from reabsorbing moisture from the air and without wasting energy unnecessarily. You can also activate the ‘Maintenance’ mode manually at any time: simply hold down the SET button for 5 seconds until ‘00’ flashes, then release it. It will remain active until you switch off the machine.
The Smart Timer
If you want a specific time setting, the Timer allows you to set a duration of between 1 and 72 hours, overriding the programme’s preset duration. To activate it, start the cycle, hold down SET for 5 seconds, and when “00” flashes, press SET repeatedly until you reach the desired number of hours. At the end of this time period, the dryer will automatically switch to the Hold mode, giving you unrivalled peace of mind.
Advanced settings: for temperature purists
For those who want more, the P7, t1 and t5 programmes offer a customisable temperature control. You can select the desired fan speed (minimum for the P7, maximum for the t1, automatically modulated and variable for the t5) and then set the operating temperature. Simply start the programme, hold down SET and ON/OFF together for 5 seconds, and use SET (to increase) and ON/OFF (to decrease) the temperature shown on the screen until the desired temperature is displayed. Once the temperature is displayed, wait a few seconds without touching anything, and the system will save your selection. This setting will remain in effect for that programme until you unplug the unit.
Mistakes to avoid and best practice
To conclude, I’d like to share with you a few golden rules to ensure your tumble dryer has a long and efficient life:
- Never stall the engine: If you remove the motor from the tunnel, never place it on a horizontal surface whilst it is switched on or cooling down. The fan would jam. Always keep it in an upright position.
- Please follow the cooling cycle: When you switch off the tumble dryer, you may hear the fan speed up. This is the system dissipating excess heat (the internal temperature is cooling down safely). Never unplug the appliance at this point! Wait until the display starts flashing with the name of the last programme used. That’s your signal to unplug the appliance.
- Load all the baskets: Even if you only need to dry a few slices of apple, always place all the empty trays inside the tunnel. This ensures proper horizontal airflow, allowing the system to calculate the exact temperature and guarantee even drying on every level.
Drying is a never-ending journey of discovery. I invite you to experiment with these functions, to try out the manual programmes for your new combinations and, why not, to assess which options are best suited to your workload, perhaps even going so far as to Explore the B.Master range for professionals if your production increases. All the best with your work and, as always, happy drying to you all!
Author – Livio Zanon Santon
 Italian
  English
  German
  Spanish
  French
  Romanian